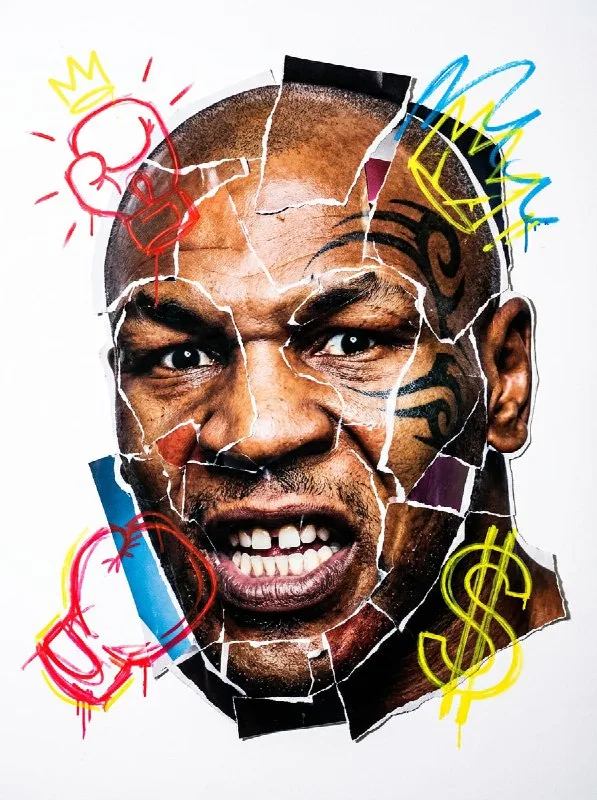
Define the exercise result
Post No. 193 contains a detailed prompt for an expressive urban portrait. It separates the face, marker drawings, materials and composition. This structure lets you refine a weak part without changing the entire idea.
Start with one subject and one expression: laughter, a scream or an intense stare. Do not request all emotions at once. Describe a fictional character for practice; for a specific person, a name alone does not ensure accurate likeness.
The exercise aims to create an expressive poster image. It uses an oversized head and rough joins, so assessing the result like ordinary portrait retouching would be inappropriate.
The complete collage prompt
A portrait of paper fragments and graffiti
[Name]
Act as a contemporary mixed-media artist creating a raw, aggressive urban portrait collage.
1. SUBJECT OF THE PORTRAIT (AGGRESSIVE COLLAGE & EMOTION):
Create a hyper-realistic caricature of [Name] with an oversized head, built using aggressive photo-montage techniques.
Facial Expression (High Energy):
The subject must display an instinctive, highly charged emotional expression (e.g. explosive laughter, a primal scream, a focused snarl, a manic wide-eyed stare). No passive, calm, or neutral expressions.
“Raw Cut-Out” Technique (CRITICAL):
The face must NOT be a single cohesive photograph. It should be a rough assembly of mismatched parts taken from different sources. Clearly visible rough, uneven white paper tear lines and seams must appear where the eyes, mouth, and forehead overlap and are glued together. The edges should look analog, handmade, and imperfect — like torn magazine pages assembled by hand.
2. “GRAFFITI EXPLOSION” (INTENTIONAL CONTENT & DYNAMIC PLACEMENT):
Overlay the collage with whimsical, hand-drawn neon marker illustrations.
Color & Content Logic (Automatic):
Determine the signature color AND 2–3 iconic symbols/logos associated with [Name]. Draw these specific symbols roughly in bright neon tones.
PLACEMENT (BOUNDARY-BREAKING):
The illustrated elements must NOT stay inside the face. They should dynamically burst outward, breaking the head’s silhouette and expanding sharply into the surrounding white negative space.
3. PHOTOGRAPHY, LIGHTING & TEXTURE:
Style:
Raw street art fused with high-end photography.
Texture:
Emphasize the tactile contrast of materials: the glossy surface of photo paper, the fibrous texture of torn white edges, and the waxy texture of neon marker ink.
Lighting:
Harsh, high-contrast studio lighting that casts sharp shadows, accentuating the layered cuts and paper depth.
4. COMPOSITION:
Framing:
The photographic head is centered, but the composition feels chaotic due to scattered, explosive doodles.
Background:
Pure white (#FFFFFF). Clean, flat, texture-free, providing maximum contrast for the chaotic collage.
3:4Replace every [Name] with the name or description of one subject. Choose an expression from Facial Expression separately. The source lists emotions as alternatives and explicitly rules out a calm face.
Check that the face really consists of pieces
The key command is in Raw Cut-Out Technique: the face should not be one continuous photograph. It needs mismatched eye, mouth and forehead fragments, white torn edges and visible overlaps.
If you get a smooth photo with a paper border, the main technique has failed. Specify seams within the face rather than more paper around the head. Try one eye slightly larger than the other or shift the mouth fragment while preserving a recognizable expression.
Chaos still requires composition. If the nose, eyes and mouth move too far apart, viewers see scattered details rather than a portrait. Find the whole face in a small preview first, then inspect edges and texture.
Limit the symbols and color
The source asks the generator to identify a color and two or three symbols associated with the subject. For your project, name them explicitly: an orange marker, basketball and motion arrows for a sports character, for example.
Do not request ten recognizable attributes. They will cover the face and turn the background into a collection of icons. Repeating two symbols at different scales can create rhythm without adding stories.
Drawings should extend beyond the head's silhouette. If every stroke stays inside the face, the composition loses its intended energy. Preserve surrounding white space: it separates the scattered elements and leaves room for a caption.
Assemble the final poster in an editor
Place the portrait on a white base and add the event name in a regular font. Do not repeat every tear and tilt in each line of text: one calm block makes information readable beside a busy illustration.
Compare two portrait sizes with the headline in the same position. Choose a version where the face remains the focus and drawings are not accidentally cropped. Torn edges should look intentional, not like a faulty cutout.
Browse free collections for backgrounds and details. Match any additional textures to the portrait's paper surface, avoiding an unnecessary new material such as concrete over magazine paper.
Assets for your next layouts
Use this portrait as a poster's central illustration. Designer Pack includes textures, collage elements and source files for further assembly; its contents are shown separately.