What can you get from one photo?
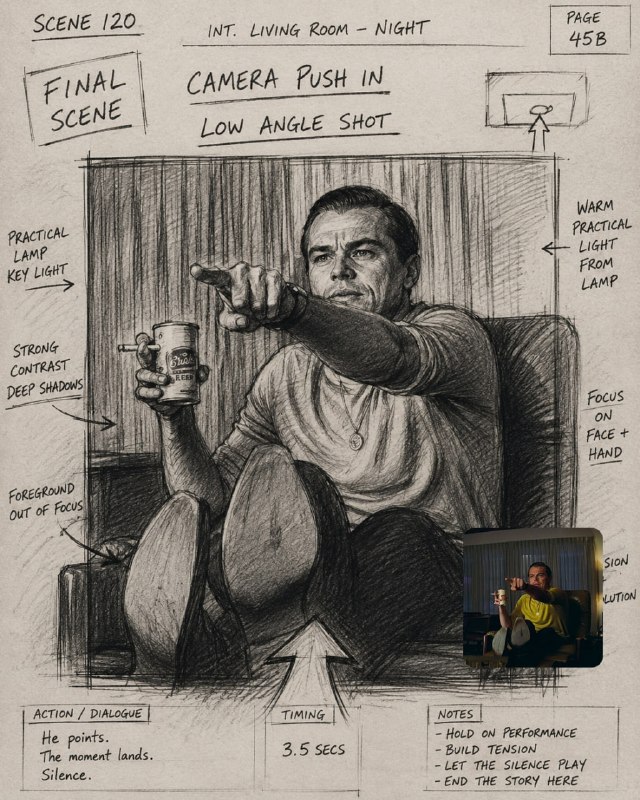
A storyboard from a photo using a neural network helps present the scene in the form of a rough pencil sketch. On it you can discuss the size, position of the hero, light and camera movement. This is useful for first sketches of a video or a visual explanation of an idea.
One generated frame is not yet a complete storyboard. Sequence requires deciding what happens before and after, how long the action lasts, and how the viewer transitions between shots. These decisions remain with the author: the neural network can design the selected scene, but does not know your script.
Start with a simple action: the character turns, shows an object, or approaches the window. State it in one sentence. Then choose what you want the viewer to notice—a face, a hand, an object, or the space around the character.
Prompt for pencil storyboard
Attach your original photo in an image-enabled tool and submit a request from our publication. He sets the pencil drawing, frame and director's notes.
Pencil storyboard from photography
Turn this photo into a cinematic storyboard frame from a movie.
rough pencil storyboard sketch, director notes around the frame, cinematic camera composition, hand-drawn movie scene, quick concept sketch aesthetic, camera arrows and annotations, dramatic lighting notes, film production storyboard style, dynamic perspective, messy pencil strokes, scene timing notes, visual storytelling composition, monochrome paper texture, rough shading, movie pre-production art, handwritten text elements, cinematic atmosphere, ultra detailed, 4:5 composition
Add storyboard notes: “CAMERA PUSH IN” “FINAL SCENE” “LOW ANGLE SHOT”There are three notes at the end: CAMERA PUSH IN, FINAL SCENE and LOW ANGLE SHOT. They signify the camera zooming in, the final scene, and the low angle. Don't leave them automatically if your idea is different: replace them with actual directions for the shot you want.
For example, a still wide shot will require a description of the fixed camera and the wider space. For a close-up of an object - clarifying the focus on the object. If the low angle is not needed, remove it entirely from the request so that it does not conflict with the rest of the guidelines.
Which marks help and which ones create noise?
Pencil arrows and captions may look convincing, but they don't always accurately represent movement. Check if the direction of the arrow matches your idea. Approaching the camera and turning the hero are different actions, and the drawing should distinguish between them.
The generated scene numbers, times and comments can also be random. Do not use them as a finished production plan. For a working storyboard, add precise captions by hand: shot number, action, duration, sound, and camera movement.
If the design is cluttered, ask for fewer notes or a clean frame with no text. This will provide a more convenient basis for your own explanation. Clear action and composition are more important than the resemblance of the sheet to a movie prop.
How to collect three frames of one scene
- Write down the beginning: where the hero is and what is visible in the general plan.
- Select the main action and the appropriate size.
- Determine the final frame that completes the thought.
- Create a sketch for each item, keeping a description of the hero and environment.
- Place the frames side by side in the editor and add precise comments.
Use the already selected frame as an additional reference if the tool supports it. This way you can explain what clothes, objects and furnishings need to be preserved. But the same prompt does not guarantee continuity: compare the face, details and position of objects in all images.
For a sequence of three frames, it is not necessary to change the entire environment. Often a general shot, a close-up of the action, and details are sufficient. First, check that the event is clear without captions, and then add technical explanations.
Checking whether the storyboard is suitable for the task
Show the sequence to someone who hasn't seen the original idea. Ask to retell the action. If he understands differently, clarify the size, pose or order of shots. A beautiful drawing does not compensate for an incomprehensible sequence.
Before discussing shooting, check whether the selected angle and movement can be repeated in your conditions. Write down the limitations: camera position, available space and props. If the task is only to present the concept, label the frames as visual sketches.
For another way to stylize the source code, there are three prompts for anime, manga and game art. And the final name of the project can be issued separately according to the instructions for assembling a poster with AI typography .
Select the inscription for the next layout
To present an idea, video cover or final poster, you may need an expressive caption. There are 823 prompts with examples in Creative TyPography. Check out the collection or try a free demo.